 My family is still fairly young and we are still establishing our family holiday traditions. This year, I thought it would be fun to have an Advent (countdown-to-Christmas) Calendar, and have a festive activity for each day til Christmas. Construction is simple (also cheap)- and shouldn't take much to do at all!
Materials*Colored felt (including white, or else have some cotton batting ready)
*Colored cardstock
*Needle and colored thread (including white)
*Tape (any variety, really)
*Black Sharpie/Wite-Out pen
*Rick-rack (or embroidery floss)
*Glue (optional)
Instructions
1. Make a house in your desired colors from a square and triangle shaped piece of cardstock. Glue/tape them together (I glued). *note* I won't give measurements, etc, so you can feel free to make your calendar as big or as small as you want- just make sure your sizes are proportional.
2. Using coordinating thread and rick-rack/embroidery floss, create a 'garland' on your house and then secure with a few stitches. (yup, just sew by hand through the cardstock.) *hint* tape your knots on the back of your cardstock to ensure they don't come loose.
3. Cut 6 1 1/2 inch long Christmas 'lights' from colored paper. If you have two sided paper like I had (black on one side, red on the other), even better, but just plain red/green works fine. Cut the 'light' shaped pieces out (with a quarter to half inch nub on the top) and fold the top over so that the 'light' will hang on your rick-rack 'garland'.
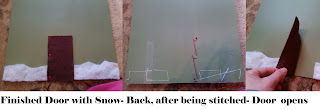
4. Once you've hung your lights, cut out a felt door and 'snow' from either cotton batting or white felt, and attach by sewing to your house. I used a cross stitch for the door on the left side, as the door needs to open- the 'snow' can be fully attached, as it does not need to be flip-open-able. *note* again, I put tape wherever I had a knot to further secure it.
5. Next, we'll be making windows! Cut out 12 square pieces of felt (yellow/white/blue work ok) and arrange into two six-paned windows, one on each side of the house. Attach each pane with a single, long stitch on the left or right side only (so that the windows can open, much like the door- remember, we have to put advent activities behind them!)
6. Next, below one of our windows, we'll make a flippable snow man. Using the same felt/batting, cut out two circles for your snowman. Create a face on the smaller circle (using felt, marker, whatever) and attach with a few stitches using white thread to ONLY the top of his head and then ONLY to the top of his body (so that the two pieces can flip up to reveal their secret activity...)
7. Almost, almost done! Chimney next. Cut a rectangle of brown felt, then three smaller rectangles of red felt, and a piece of 'smoke' from white felt/cotton batting. Attach each red 'brick' using a single long stitch on ONE side only (they'll flippers, too) and attach the smoke to the top of the chimney. Once your chimney is assembled, stich it on one side to the top of the house so that the entire chimney will be able to flip open, just like the door on the front
8. Really, REALLY almost done now! Using your black Sharpie and Wite-Out pen, number each flipper/light with a number 1-25
1- Chimney itself
2- Top brick on chimney
3- Middle brick on chimney
4- Bottom brick on chimney
5- Light one
6- Light two
7- Light three
8- Light four
9- Light five
10- Light six
11- Window pane one
12- Window pane two
13- Window pane three
14- Window pane four
15- Window pane five
16- Window pane six
17- Window pane seven
18- Window pane eight
19- Window pane nine
20- Window pane ten
21- Window pane eleven
22- Window pane twelve
23- Snowman head
24- Snowman body
25- Front door- Merry Christmas!
 |
| Numbered and DONE! All Finished~! |
Once you've finished your advent calendar, figure out 25 activities for your family to do during the month, write them down on 25 different pieces of paper. Fold each one up and use masking tape to
tape them behind each of the numbered items on your calendar. Some ideas?
*Have a snow ball fight
*Go caroling
*Go sledding
*Make hot cocoa
*Fireplace fire
*Buy gifts for Sub-for-Santa
*Deliver neighbor gifts
*Make cookies
*Make fudge/caramel
*Go on a drive to see Christmas lights
*Read a favorite Christmas book
*Go to a Christmas concert
*Make gingerbread houses
*Shovel walk for neighbors
*Make a snowman
*Go Christmas shopping
*Visit a senior center with treats
*Make your own candy canes
*Decorate the tree
*Make garlands
*Go to the Nutcracker
*Watch a favorite Christmas movie
*Make a snow fort
*Rake neighbor's leaves
*Decorate for Christmas
*Hang the lights
*Donate to a food bank
*Volunteer at a soup kitchen
*Wrap Christmas presents
*Pick Secret Santas (kids pick their siblings names out of a hat and do kind things for them 'secretly' for a week, then try to guess who has who)
*Read the Christmas story from the Bible
*Act out the Christmas story using costumes
etc.
Have any other ideas? Post them as a comment to this post and share with everyone else! I can guarantee you it will be much appreciated. (especially by me....)


